Personal 3-Weapon / Body-Cord Tester
This 
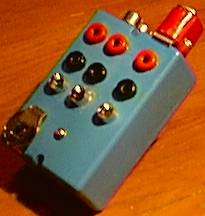
new, improved version of my popular 3-light tester is a pocket sized wonder. Measuring just 4.5" x 2.38" x 1.75," it's not much bigger than the more common 2-light* testers sold by most suppliers. The small step up in size, however, belies a huge difference in value. The 2-light testers are awkward, unreliable and limited in the information they can reveal. Mine is not. In the interest of comparison, below is a description of typical troubleshooting procedures as performed with the a standard 2-light tester vs. the same procedures as performed with my 3-light tester. I think you'll find there's really no comparison :-)
 

How To Test A Foil/Saber Body-Cord:
Typical 2-Light Tester Armorer X 3-Light Tester
  1. Plug the 3-prong end of the cord into the tester.
  2. Use a metal object (not included) to short the B and C lines at the 2-prong or bayonet plug. Light #2 should glow (if it does not, then you have an open circuit, e.g. a break in line B, C, or both; there's no way to be sure which). Note: If the body-cord is of the 2-prong variety this is easy, with a bayonet it is not easy at all. In both cases it is rather difficult to perform a "wiggle test," so results can be quite unreliable and tracking down intermittent problems can be a real headache
  3. Short the body-cord's lame clip to it's B line at the 2-prong or bayonet plug. Light #1 should glow (if it does not, then you have an open circuit) Note: If the body-cord is of a 2-prong type, this is easy, as you can actually clip the A line onto the B line. With a bayonet body-cord you can't. Period. "Wiggle testing" becomes impossible.
    1. Plug the cord's 3-prong plug into the tester's black 3-prong socket. 
    2. Plug the cord's other end into the tester's 2-prong or bayonet socket, as applicable. 
    3. Clip the cord's lame clip onto the tester's clip junction (the metal loop just below the LED array). The tester has a dedicated LED for each line so it's easy to read. If the cord is in good working order, you will see an LED light up for each of the three lines. If any of the LEDs are off or flickering, then you have a problem with the corresponding line. Because the tester has actual matching sockets/connectors for each end of the body-cord "wiggle testing" is easy, and finding the source of intermittent problems is a snap.

How To Test An Epee Body Cord:
Typical 2-Light Tester Armorer X 3-Light Tester
  1. Plug one end of the cord into the tester.
  2. Use a metal object (not included) to short the B and C lines at the free end. Light #2 should glow (if it does not, then you have an open circuit, e.g. a break in line B, C, or both; there's no way to  be sure which).
  3. Use a metal object (not included) to short the B and A lines at the free end. Light #1 should glow (if it does not, then you have an open circuit, e.g. a break in line B, A, or both; there's no way to  be sure which). 

  4. Note: Because of the necessity to use a foreign object to short the lines, performing a "wiggle test" is difficult. Results can be quite unreliable and tracking down intermittent problems is a guessing game.

  1. Plug one end of the cord into the tester's black 3-prong socket and the other into the red 3-prong socket. 

  2. The tester has a dedicated LED for each line so it's easy to read. If the cord is in good working order, you will see an LED light up for each of the three lines. If any of the LEDs are off or flickering, then you have a problem with the corresponding line. Because the tester has actual matching sockets for each end of the body-cord "wiggle testing" is easy, and finding the source of intermittent problems is a snap.

How To Test A Head Cord:
Typical 2-Light Tester Armorer X 3-Light Tester
Note: Some of the 2-light testers have metal banana jacks, which have a sufficiently high profile to allow for a head-cord to be clipped to the B and C or B and A jacks (it doesn't matter which). With these particular testers there is generally no difficulty to be had in testing head-cords. Most 2-light testers, however, use low profile, plastic-exterior banana jacks. in order to test a head-cord with one of these you need some device to serve as an extension to the banana jacks' metal surfaces so that you can clip on a head-cord. Usually the most readily available item to use is a body cord. Here's how.
  1. Plug a working body-cord into the tester.
  2. Clip one end of the head cord to the body-cord's B line and the other to it's C or A line (it doesn't matter which). Note: For obvious reasons "wiggle testing" is very impractical in this configuration. If your using a bayonet body-cord, I'd say it's impossible.
  1. Clip one end of the cord onto the tester's clip junction (the metal loop just below the LED array) and the other end onto the B-line half of the tester's 2-prong socket. The red LED should glow (if it does not, then your cord is broken). 

Note: The procedures for testing electric foils, epees and sabers are essentially identical for both the common 2-light tester and my 3-light model.


$50.00
Check Out Now

Return to Catalog

 www.armorerx.com

*"Tim's Tiny Tester" is an exception. It is the size of a 3-prong plug and provides the same functionality as any standard 2-light tester. It is a very cool innovation and Tim Hively is to be commended for it. If you want the tiniest tester on the planet, get "Tim's Tiny Tester." If you want a typically sized tester which provides superior ease of use, greater depth of features and more reliable testing results, then buy mine.